Just because you’re injured, does NOT mean you cannot continue making progress.
Akash Vaghela
·
Aug 24th, 2022
TrainingBeginner
12 Mins
Share
One of the most irritating things that can happen when you’re trying to better yourself in the gym is suffering some sort of injury. The common reaction here is to simply just rest and do nothing until it eventually goes away but unless the injury was truly catastrophic where you are completely immobilised, there is always something you can be doing from a training/activity perspective to continue moving forward.
Learning to work around injuries, NOT through them is the key here and many would be very surprised with just how much they can do when they incorporate some intelligent modifications into their plans.
First Steps After An Injury
The most important thing here is to not panic. These things happen and in 99.9% of cases, it’s not the end of the world especially if you’re a recreational trainee wanting to improve your body composition and health.
If you injured yourself during your session, try to see if there is still something you can do with other body parts that causes you no pain nor hinder your stability in a meaningful way.
There is no need to apply ice to the area as recent research has demonstrated that applying ice during the initial phases may actually delay the healing process by suppressing important inflammatory markers.
In the latest iteration of treating soft tissue injuries PEACE & LOVE, we can clearly see the removal of ice/cold therapy as a valid tool.
Protection
Keep weight off the injury, position yourself in a way that minimises pain and make sure that whatever you’re doing is not aggravating the injury.
Elevation
Elevate the injured limb so it’s above the heart when resting. You can do this a few times per day for 10-15 minutes at a time.
Avoid Anti Inflammatories
This may sound counter intuitive but at this stage, pain signals are very important as they provide good feedback.
If you have rolled your ankle but you drug yourself to the point where you feel no pain, you will do more damage by continuing to walk on it.
Compression
Support the area with bandages if needed.
Education
Learning about the injury from a credible source can be very helpful here. We highly recommend reading up on the information that R & D physiotherapy provides on their website.
&
Load
Start loading the injured area as soon as you can, even with the extremely light loads. Not only will this improve the recovery process, but it will instill confidence and belief which ties in to the next point.
Optimism
This is absolutely essential! Do not fall into the trap of thinking you cannot train anymore or how long the recovery is going to be.
When it comes to building muscle or improving your appearance, there are MANY things you can utilize to your advantage.
Do not be a victim, own the injury, do what’s needed to improve the recovery process and focus on what you CAN do vs what you cannot.
Vascularisation
This simply refers to getting blood into the area as often as possible which segues nicely into the final point.
Exercise
You must continue to move in whatever ways you can. This does not mean moving through the pain but instead, working around it in intelligent ways without aggravating the recovery process.
This ties into the optimism point as by continuing to exercise, you are empowering yourself to not be a victim and identify as someone who finds solutions, not excuses.
There is ALWAYS something you can be doing to improve your situation, especially when you have a team of experts who can view your training videos, give feedback along with appropriate suggestions to keep you moving forward.
On that note, let’s dive into some common injuries and strategies that may be helpful to you.
Best Practices For Common Injuries
The below are some simple tips you can apply when encountering some common injuries. Please keep in mind that these are just general guidelines and if anything still causes you pain, simply avoid it or follow the instructions from your physical therapist.
Lower Back
If you do feel some aggravation here with certain exercises, it’s important you look at your technique as not bracing correctly or overall positioning on an exercise are usually the most common culprits.
The below is taken from “Breathing & Bracing” which is one of the many exclusive guides we provide for our members in RNT Pro.
“How To Brace:
This refers to using your breath and musculature to create a lot of tension and subsequent stability throughout your entire torso. To do this, you want to think about:
- Breathing air into your abdominals, NOT your chest.
- Expanding this breath into your obliques and lower back as well.
- Creating a “cylinder” around your spine.
- Making yourself as “fat” as possible.
If you have never done this sort of breathing before it’s wise to actually practice by lying on the floor and placing one hand on your chest and one hand on your stomach. From here, aim to raise the hand that is placed on the stomach as high as you can with one big inhale.”
If you have addressed the above and your lower back is still hurting, try incorporating exercises that remove the contribution of the lower back but still allow you to train the target muscles. It’s best to work in a fashion that requires less and less stability to find what is ideal for you instead of just going to the “least impactful” exercise.
See the table below for some examples.
Shoulders
Due to the large range of motion along with the 17 muscles that attach to the scapula, it can be very tricky to determine what exactly is causing pain. Regardless, there are some common themes we continue to see.
Most of the time, the shoulders will be aggravated by mostly horizontal/vertical pushing exercises such as barbell/DB chest press, barbell/DB overhead press along with vertical pulling exercises such as pull ups or pulldowns.
Horizontal pulling on the other hand appears to be very comfortable for most people so we recommend incorporating more of these sorts of exercises as not only will they allow you to continue training, but will also help strengthen the muscles that keep the shoulders healthy that many people neglect.
Some great options include:
Single Arm DB Rows
Seated Cable Rows
Barbell Rows (underhand grip)
Ring Rows
Rear Delt Cable/Machine Flyes
Our programs already have a lot of these exercises built into them so our members don’t need to worry about including them.
So does that mean we only stick to rowing exercises?
Definitely not.The key here is to not neglect all of the potential culprits but instead, continue doing those exercises in a way that allows you to continue training the target muscle. This means:
Selecting an appropriate load.
Selecting an appropriate grip (very commonly overlooked).
Staying 3-4 reps shy of failure.
Opting for higher rep sets until your technique improves.
Sending your training videos to a reputable source for analysis.
The amount of times we have had members come in with shoulder injuries who were told they “can’t do this or can never do that” is alarmingly high. In fact, one of our members was told he could NEVER do certain shoulder exercises for the rest of his life without pain.
Matt is actually the strongest he has ever been right now and is continuing to make fantastic progress.
Why? Because he shares his training videos regularly and applies all the principles we have been discussing within this article.
Knees/Ankles
If either of these joints get injured, most of the time you may still be able to train your hamstrings and hips to some degree pan free.
The following can replace any quad/calf based work you have in your plan until the knee starts feeling better:
Glute Bridges
Hip Thrusts
Romanian Deadlifts
Deadlifts
Lying/Seated Leg Curls
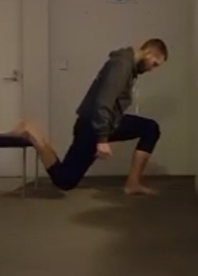
Additionally, you should still attempt to perform squat and lunge based exercises with more of a leaning torso as this will place more stress into the hips and less on the knee joints.
Note the difference below.You may not be able to get as much bend in the ankles which is completely fine, just focus on getting that torso over the working knee.
For some, this still may be too much (especially on the back knee) so simply just avoid it for the time being.
By working on your hips, you’re also going to be improving your ability to train your legs more effectively once the knee heals.
This recent meta analysis showed exactly that. Even though it was done on patients with knee osteoarthritis, the same principles can still be applied within this context.
“The current study found high-quality evidence to support the use of hip abductor muscle strengthening exercises as a rehabilitative treatment for subjects with knee osteoarthritis.”
Strong hips = Strong knees!
Additional Tips
To help manage your injury outside of your training sessions, the following have all been shown to improve recovery.
Optimise sleep.
Manage stress and workload more effectively.
Move around more during the day if possible to increase blood flow.
Change postures throughout the day.
Include more omega 3’s in your nutritional plan.
Minimise processed foods even further.
Get a professional to make sure you’re actually lifting correctly and following a sound program.
Don’t cut calories any further because you feel you’re not “moving” as much.
Incorporate any specific stretches/exercises given to you by your physical therapist.
Be patient and keep training!
Things to NOT do:
Go see a therapist three times a week because they have told you that is the only way to get better.
Stop training altogether.
Start eating poorly.
Use the injury as an excuse as to why you can’t keep making progress.
Make the injury part of your identity.
Not film yourself performing the problematic exercises.
Wrapping Up
If you have been training for a while and you are really trying to make some serious progress, there is a good chance you may run into a few minor injuries here and there.
This is all part of the process and if you have a growth mindset you will see the injury as a learning opportunity to become better, more resilient and empowered.
The amount of times I have been injured throughout my training career is embarrassing to admit but I was always able to keep moving forward as I learnt to manage and work around them. It’s because of them I’m able to write this article to help you! Pretty cool, right?
Regardless, if your goals are simply to improve your body composition then there are many ways you can continue to improve despite the injury. Yes, there are some unfortunate injuries where any sort of movement is impossible but even then, you STILL have the power to choose how you respond to that.
This is when the power of a supportive community can really help along with getting expert advice on how to continue nailing all the other aspects of your overall health while your injury heals. Just because you’re injured, doesn’t mean you cannot continue becoming a better version of yourself.
Akash Vaghela
Akash Vaghela has spent 10+ years transforming bodies and lives around the world, and in May 2017, founded RNT Fitness to serve this purpose. His vision is to see a world transformed, where ambitious high performers experience the power of the physical as the vehicle to unlock their real potential. He’s the author of the Amazon best-selling book Transform Your Body Transform Your Life, which explains his unique and proven five-phase methodology, is host of the RNT Fitness Radio podcast, has been featured in the likes of Men’s Health and BBC, whilst regularly speaking across the world on all things transformation.
.jpg)
.jpg)